


So its been a long time coming but I have at last put together some tips and extra pictures which I hope you will find useful, interesting and even inspiring!
The extra information and guides should help any one embarking on their first knicker making project using our kit....
Choosing a Size
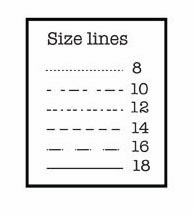 When you open your knicker making kit you will find a graded paper pattern with a range of sizes on it that may look bigger than you expect!
Remember that you are making a cotton knicker that will be gathered in with elastic and look much smaller. In order to choose what size you will need to take your hip measurement and then either cut out or trace off the relevant size, if you do this you can reuse your pattern in the future and make other sizes.
Layout Plan & Cutting
Sewing patterns come with a layout plan telling you how to place and cut your pattern, you need to know some terminology in order to cut out your pattern correctly.
*Selvedge - the selvedge is the edge of the fabric which was attached to the loom when the fabric was made, you can see a series of small dots along the edge of the fabric.
*Grain Line - a grain line is marked on a pattern with an arrow and needs to be placed at 90 degrees straight in line with the selvedge of the fabric.
*Bias cut - when a pattern piece is layed at a 45 degree angle to the selvedge. On a bias cut pattern the grain line is at a 45 degree angle to the top or bottom of a pattern piece.
Cotton cut on the bias has a bit of give or 'ease'.

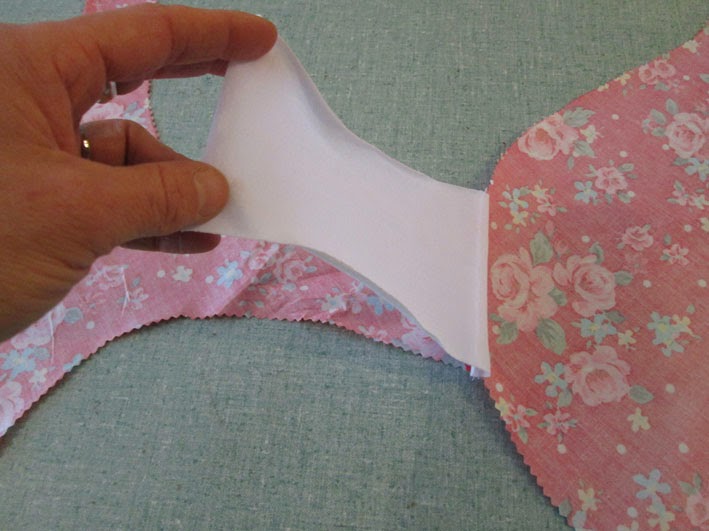
Fig.1
On your knicker kit the instructions tell you to lay the pattern on the bias.
The grain line ON BOTH PEICES is straight in line with the edge of the pattern pieces therefore sit at a 45 degree angle across the fabric.
Once you have placed your pieces accurately you are ready to pin and cut.
Picture Guide
 |
| Front and back of fabric cut out. |
 |
| Lay fabric together with cut out gusset in this order: gusset first, second bottom of knicker right side up, finally front of knicker right side down. |
 |
| Pin together in this order. |
 |
| Using the edge of your presser foot as a guide along the edge of your fabric sew across on a straight stitch. |
 |
| Then open out your knicker it will look like this. |
 |
| Flip the gusset over encasing the seam you have sewn and pin in place. |
 |
| Then on the right side of the fabric sew along each side of the knicker slong the gusset edge attaching the gusset to the knicker. This row or stitching is like tacking and won't show at the end as it will be covered over by your elastic. |
 |
| Trim the edges of the gusset to neaten if need be, it should now look like this. |
 |
| You are now ready to change your machine to a zig zag stitch and attach your elastic, remember to colour match your top threads with your elastic. |
 |
| You add your elastic along the front, back and each leg trying to keep the gather even. At the end of each side cut through the elastic. Your knicker should now look like this. |
 |
| The final stage is joining up the side seams, for this you put your machine back to a straight stitch and put front to back together on each side right sides facing. Remember to either go forwards and backwards at each end of your seam Sew carefully and check to make sure you have lined up your elastic either side so that when you turn it through it looks like a continuous piece elastic. |
| You can then add a ribbon as a finishing touch! |

