Flo-Jo Boutique

Tuesday, 21 January 2014

Knicker Making Kit Sewing Tips


So its been a long time coming but I have at last put together some tips and extra pictures which I hope you will find useful, interesting and even inspiring! 
The extra information and guides should help any one embarking on their first knicker making project using our kit....

Choosing a Size


When you open your knicker making kit you will find a graded paper pattern with a range of sizes on it that may look bigger than you expect! 
Remember that you are making a cotton knicker that will be gathered in with elastic and look much smaller. In order to choose what size you will need to take your hip measurement and then either cut out or trace off  the relevant size, if you do this you can reuse your pattern in the future and make other sizes.


Layout Plan & Cutting

Sewing patterns come with a layout plan telling you how to place and cut your pattern, you need to know some terminology in order to cut out your pattern correctly.
*Selvedge - the selvedge is the edge of the fabric which was attached to the loom when the fabric was made, you can see a series of small dots along the edge of the fabric.
*Grain Line - a grain line is marked on a pattern with an arrow and needs to be placed at 90 degrees straight in line with the selvedge of the fabric.
*Bias cut - when a pattern piece is layed at a 45 degree angle to the selvedge. On a bias cut pattern the grain line is at a 45 degree angle to the top or bottom of a pattern  piece. 
Cotton cut on the bias has a bit of give or 'ease'.


Fig.1
On your knicker kit the instructions tell you to lay the pattern on the bias. 
The grain line ON BOTH PEICES is straight in line with the edge of the pattern pieces therefore sit at a 45 degree angle across the fabric.
Once you have placed your pieces accurately you are ready to pin and cut.


Picture Guide

Front and back of fabric cut out.
Lay fabric together with cut out gusset in this order: gusset first, second bottom of knicker right side up, finally front of knicker right side down.
Pin together in this order.


Using the edge of your presser foot as a guide along the edge of your fabric sew across on a straight stitch.

Then open out your knicker it will look like this.


Flip the gusset over encasing the seam you have sewn and pin in place.

Then on the right side of the fabric sew along each side of the knicker slong the gusset edge attaching the gusset to the knicker. This row or stitching is like tacking and won't show at the end as it will be covered over by your elastic.

Trim the edges of the gusset to neaten if
need be, it should now look like this.

You are now ready to change your machine to a zig zag stitch and attach your elastic, remember to colour match your top threads with your elastic.

You add your elastic along the front, back and each leg trying to keep the gather even. At the end of each side cut through the elastic. Your knicker should now look like this.

The final stage is joining up the side seams, for this you put your machine back to a straight stitch and put front to back together on each side right sides facing. Remember to either go forwards and backwards at each end of your seam Sew carefully and check to make sure you have lined up your elastic either side so that when you turn it through it looks like a continuous piece elastic.

You can then add a ribbon as a finishing touch!


Wednesday, 6 November 2013

Button Bag Sewing Kits

We have now been stocking Button Bag sewing and craft kits for over a year in our shop in Bristol and are now really pleased to have added them to our ever expanding online shop.
http://flo-joboutique.co.uk/#/shop/4574185016/Craft-kits
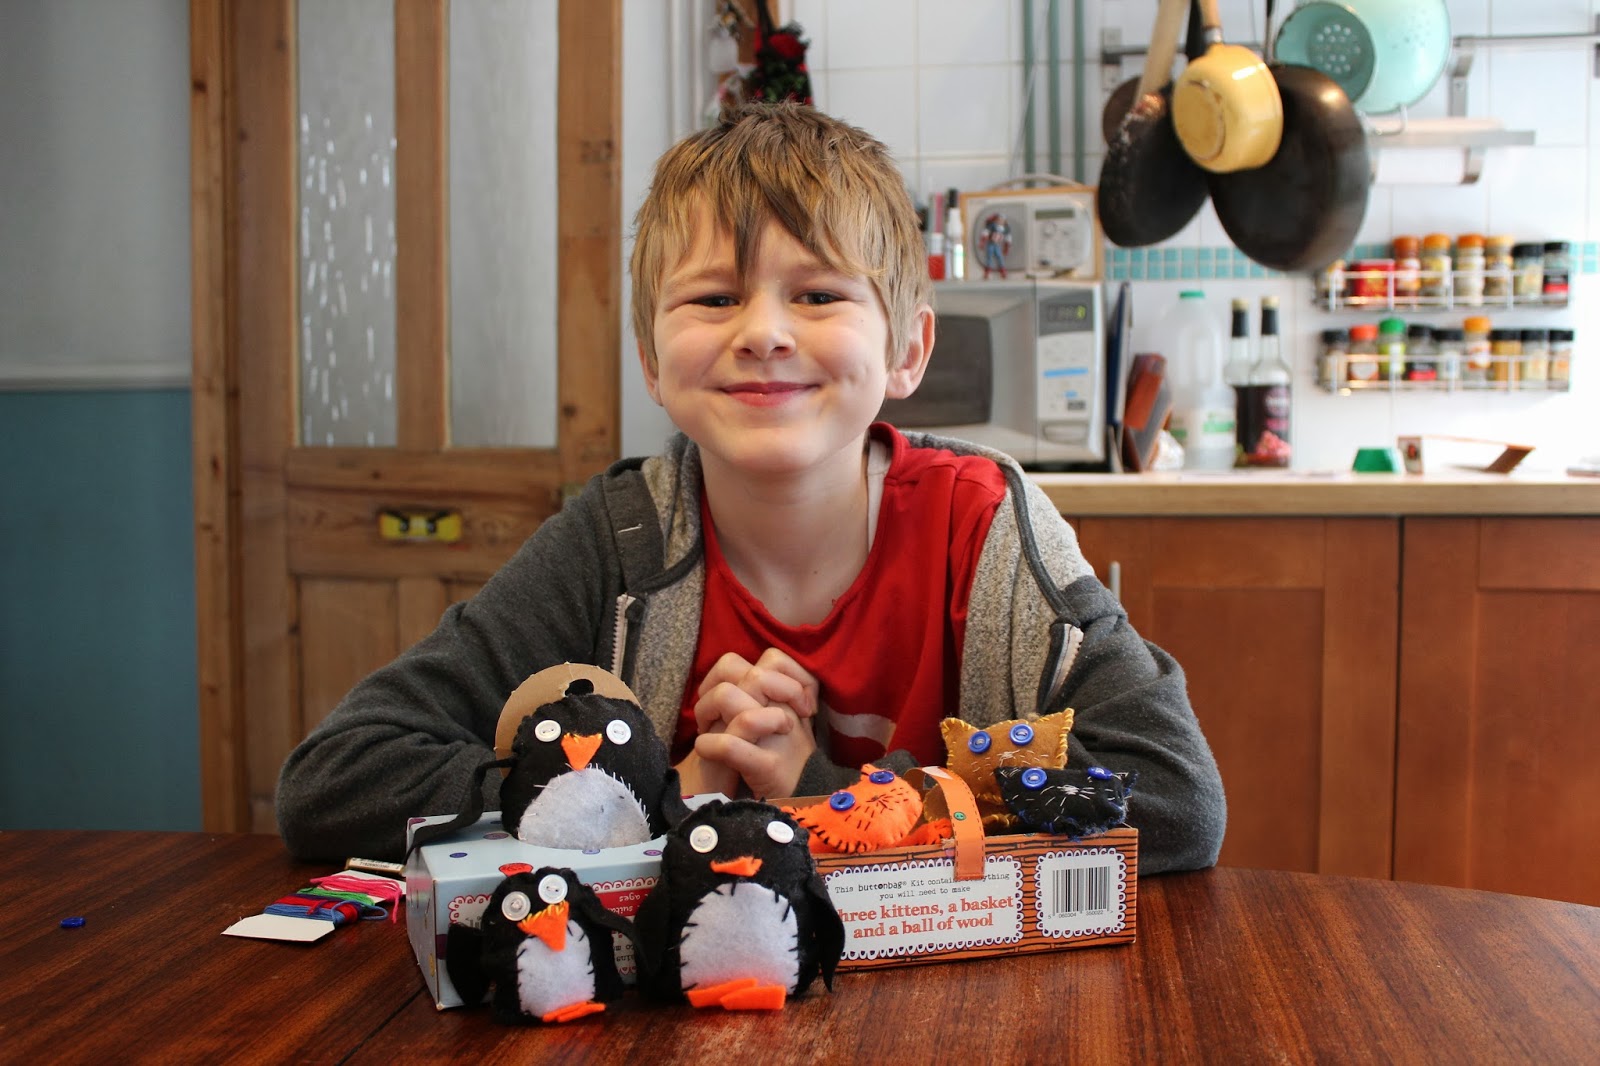
An obviously great way of selling the kits is by trying them out ourselves. Fortunately, I  have the perfect aged child who loves working his way through the cute range of animal and bird sewing kits and yes he is a BOY!
Easy to forget but boys love sewing too, perfect for developing hand eye co-ordination and making sure the future generation know how to sew a button on!
I know that I will be adding another in the range to his stocking this year!

The Making of Kitten Basket


As with all Button Bag kits all the materials are included; threads, stuffing, buttons and clear simple instructions, the only thing we needed was a small pair of scissors to cut threads. The pre-cut shapes mean that kids can get straight on with sewing which is a nice touch.


Django made the kittens over a number of weeks, enjoying the sense of completion that was achieved as each kitten was finished. By kitten number three he was sewing totally independently and was very proud of his creations which could then be added to the penguins that had been his first sewing project earlier this year.

A great finishing touch is that the box that the kit comes in transforms into a home for your creation, in this case a basket for the kittens, to join the penguins in their igloo home.


A proud and happy customer!

Monday, 4 November 2013

I was really pleased to see that Tilly of 'Tilly and the buttons' and The Sewing Bee fame, made a lovely pair of knickers using our knicker kit pattern. 
She took the creative stage a little further and opted to make them out of a scrap of fabric from a blouse she had made. We love hearing this as that's the point of the pattern! We hope that others use the pattern from the kit again and again. 
We do sell a Liberty print tana lawn fabric kit as well as the cotton kit. 
Do check out her blog!
http://www.tillyandthebuttons.com/2013/03/knickers.html


We hear that the Sewing Bee is due to return as our after Christmas treat, we're looking forward to it already!

Thursday, 3 October 2013

Day of the dead!

We know it's not for another month but this celebration of our ancestors is dear to us so we really wanted to showcase our lovely fabrics in plenty of time for all our customers to get creative.
For anyone who's not familiar with the festival he's a bit of back knowledge...

Day of the Dead (Spanish: Día de Muertos) is a Mexican holiday celebrated throughout Mexico and around the world in other cultures. The holiday focuses on gatherings of family and friends to pray for and remember friends and family members who have died. It is particularly celebrated in Mexico, where it is a national holiday, and all banks are closed. The celebration takes place on November 1 and 2, in connection with the Catholic holidays of All Saints' Day and All Souls' Day. Traditions connected with the holiday include building private altars honoring the deceased using sugar skulls, marigolds, and the favorite foods and beverages of the departed and visiting graves with these as gifts. They also leave possessions of the deceased.
Scholars trace the origins of the modern Mexican holiday to indigenous observances dating back hundreds of years and to an Aztec festival dedicated to the goddess Mictecacihuatl. The holiday has spread throughout the world: In Brazil, Dia de Finados is a public holiday that many Brazilians celebrate by visiting cemeteries and churches. In Spain, there are festivals and parades, and, at the end of the day, people gather at cemeteries and pray for their dead loved ones. Similar observances occur elsewhere in Europe, and similarly themed celebrations appear in manyAsian and African cultures.
In some parts of the country (especially the cities, where in recent years other customs have been displaced), children in costumes roam the streets, knocking on people's doors for a calaverita, a small gift of candies or money; they also ask passersby for it. This relatively recent custom is similar to that of Halloween's trick-or-treating.
Some people believe possessing Day of the Dead items can bring good luck. Many people get tattoos or have dolls of the dead to carry with them. They also clean their houses and prepare the favorite dishes of their deceased loved ones to place upon their altar or ofrenda.
So we've decided to create a Day of the Dead window display and within this Erika and I have placed pictures of some of our deceased family members. There's something special about having their photos sat in our window here in our shop with us. 

Monday, 30 September 2013

New organic Cotton and Cotton Bamboo mix from India.

We've found a new supplier for ORGANIC cotton and cotton/bamboo mix prints. 

The fact that the prints are so pretty and inspired from a book of 1920's prints would have been enough for us but to find out that we bought them from a wonderful British company who's work in India is supporting some of the worlds poorest communities and really making a difference to their lives and their surrounding environment  is even better news!

They are copies of 1920's prints that they found in an old book.
Dress weight, or maybe for patchwork and craft, made from slub organic cotton warp and bamboo weft.
Hand printed, so the print will have some variations.
They are really special, and we can't wait to make ourselves a dress each for work. 
We think they will look great made into a classic tea dress.


Genesh is their partner in India. This is Genesh's Aunty and her grandchildren. She winds the warp thread here for her son to weave for us. The orders we give them enables them to avoid poverty.


These new 1920's design fabrics we have are a bamboo mix. Bamboo is a sustainable product fast growing and makes the cotton feel really soft and hang beautifully. 

Bamboo textiles are cloth, yarn, and clothing made out of bamboo fibres. While historically used only for structural elements, such as bustles and the ribs of corsets, in recent years a range of technologies have been developed allowing bamboo fibre to be used in a wide range of textile and fashion applications. Modern bamboo clothing is clothing made from either 100% bamboo yarn or a blend of bamboo and cotton yarn. The bamboo yarn can also be blended with other textile fibres such as hemp or even spandex.

Wednesday, 18 September 2013


A little bit about one of our ORGANIC cotton suppliers....

Organic Cotton

The organic  cotton comes from a non GM source and is supplied by Agrocel. One of their partners is Traidcraft, the largest UK fairtrade organisation.
The cotton is grown in northern India.
Our cotton is not sprayed with toxic chemicals. Instead, weeding is done by hand and pests are controlled biologically (by encouraging other insects to control the pests). Please see the excellent PAN site (Pesticide Action Network).

Fair Trade Cotton

This means that the people who grow cotton get a fair guaranteed wage and that their health and welfare is supported. They subscribe to the Fair Trade policy defined by IFAT (The International Fair Trade Association).
The hand loom cottons are woven and safely dyed using GOTS approved non azo dyes and are woven by a charity-run project involving about 250 workers using hand looms or small power looms.
Below; one of the weavers in K.V. Kuppam, a village in Tamil Nadu state, South India, 120 miles from Chennai (Madras). The area has long been a centre for cotton handloom weaving.
The middle picture is the cotton being dryed.

We have just bought 5 new designs of organic cotton. We're really excited by the work and hope you will like them too.


Tuesday, 17 September 2013

Mademoiselle - Inside CHANEL


Beautifully made informative little films about the wonderful beginnings of the fashion house that is CHANEL....enjoy ... we did!  xx

About Me

My photo
Bristol, United Kingdom
Flo-jo Boutique is the creative baby of Delia and Erika two seamstresses from Bristol specialising in lingerie and vintage styled garments. Designers of sewing kits and creators of sewing parties their shop in Bristol and online shop are home to a gorgeous range of quality fabrics and haberdahsery, craft kits, books and handmade gifts.